From 1st February 2024, Amazon Web Services (AWS) started charging $0.005 per hour, per IPv4 public address in a concerted effort to accelerate the adoption of IPv6. To understand the reasons behind this controversial decision, we must first understand the problem AWS and other global scale service providers are facing with IPv4 and the motives behind charging for what was once a free service. Before we go into that – let us cover some of the fundamental differences between IPv4 and IPv6.
Important Information
- AWS is only charging for allocation of public IPv4 addresses
- Use of private IPv4 addresses in VPC’s are not charged
- AWS is adding 750hrs of public IPv4 address use as part of free tier
- The free tier covers 1 month of a single public IPv4 address
- Running 3 x NAT gateways across 3 x Availability Zones (AZ’s) – you will be charged for 2 x $0.005 per hour – one of the 3 x public IP addresses is free (covered by free tier)
IPv4 Background
With IPv4 we have a 32-bit address range. This provides us with a total of 4,294,967,296 (or ~4.3 billion IPv4 addresses total). It may be hard to comprehend today, but back when IPv4 was being drafted as a standard in 1982 for SATNET and 1983 for ARPANET, the creators of the protocol would never have dreamed that mobile phones, smartwatches, IoT devices would all require public IPv4 addresses to be accessible on the Internet. The Internet was not born yet as we know it. At the time, 4.3 billion IP addresses was monstrous. However, the entire address range is not allocated for use as public IP address space. The entire IPv4 address space is broken up into classes and there are several reserved ranges used for applications such as multicast, local, research, public and private IP addresses.
Special address blocks
Address block | Address range | Number of addresses | Scope | Description |
0.0.0.0/8 | 0.0.0.0–0.255.255.255 | 16777216 | Software | Current (local, “this”) network |
10.0.0.0/8 | 10.0.0.0–10.255.255.255 | 16777216 | Private network | Used for local communications within a private network |
100.64.0.0/10 | 100.64.0.0–100.127.255.255 | 4194304 | Private network | Shared address space for communications between a service provider and its subscribers when using a carrier-grade NAT |
127.0.0.0/8 | 127.0.0.0–127.255.255.255 | 16777216 | Host | Used for loopback addresses to the local host |
169.254.0.0/16 | 169.254.0.0–169.254.255.255 | 65536 | Subnet | Used for link-local addresses between two hosts on a single link when no IP address is otherwise specified, such as would have normally been retrieved from a DHCP server |
172.16.0.0/12 | 172.16.0.0–172.31.255.255 | 1048576 | Private network | Used for local communications within a private network |
192.0.0.0/24 | 192.0.0.0–192.0.0.255 | 256 | Private network | IETF Protocol Assignments, DS-Lite (/29) |
192.0.2.0/24 | 192.0.2.0–192.0.2.255 | 256 | Documentation | Assigned as TEST-NET-1, documentation, and examples |
192.88.99.0/24 | 192.88.99.0–192.88.99.255 | 256 | Internet | Reserved. Formerly used for IPv6 to IPv4 relay (included IPv6 address block 2002::/16). |
192.168.0.0/16 | 192.168.0.0–192.168.255.255 | 65536 | Private network | Used for local communications within a private network |
198.18.0.0/15 | 198.18.0.0–198.19.255.255 | 131072 | Private network | Used for benchmark testing of inter-network communications between two separate subnets |
198.51.100.0/24 | 198.51.100.0–198.51.100.255 | 256 | Documentation | Assigned as TEST-NET-2, documentation, and examples |
203.0.113.0/24 | 203.0.113.0–203.0.113.255 | 256 | Documentation | Assigned as TEST-NET-3, documentation, and examples |
224.0.0.0/4 | 224.0.0.0–239.255.255.255 | 268435456 | Internet | In use for multicast (former Class D network) |
233.252.0.0/24 | 233.252.0.0-233.252.0.255 | 256 | Documentation | Assigned as MCAST-TEST-NET, documentation, and examples (Note that this is part of the above multicast space.) |
240.0.0.0/4 | 240.0.0.0–255.255.255.254 | 268435455 | Internet | Reserved for future use (former Class E network) |
255.255.255.255/32 | 255.255.255.255 | 1 | Subnet | Reserved for the “limited broadcast” destination address |
Problem Statement
On 11th January 2010, the Internet Assigned Numbers Authority (IANA) assigned the last /8 public IP address space. To allow continued use of IPv4 public IP addresses and get around the exhaustion of unique addresses, we have been using Network Address Translation (NAT) to allow the use of private IP addresses mapped to public IP addresses. Using NAT has its limits however relating to security, port exhaustion and has forced large scale providers to use it at scale to allow for IP address reuse. Global network providers like AWS are impacted at scale by this problem and it is extremely expensive to maintain devices to cope with the scaling demands of millions of customers every day.
Accelerating adoption of IPv6 is the way to resolve this problem as it offers 1,028 times more IP addresses than IPv4. The use of NAT does not disappear completely however it does allow for a much more sustainable growth pattern than IPv4.
IPv6
In IPv6, the address is made of 128-bits. Converting this into numbers, we have a total of 340,282,366,920,938,463,463,374,607,431,768,211,456 addresses (or 2^128; 320 undecillions in terms of scaling). While IPv4 had some amazing longevity, it did not naturally include many features of IPv6. In IPv4, it relied on additional encapsulation to use unique features, and this often led to consequences to speed. Some features included in IPv6 include:
- IPv6 includes built-in Quality of Service (QoS).
- IPv6 has a built-in network security layer (IPsec).
- IPv6 eliminates Network Address Translation (NAT) and allows end-to-end connectivity at the IP layer.
- Multicasting is part of the base specifications in IPv6, while it is optional in IPv4. Multicasting allows for the transmission of a packet to multiple destinations in a single operation.
- IPv6 has larger packet headers (about twice as large as IPv4).
An IPv6 address type is designed of 128 bits from which 4 are hexadecimal digits, and it created eight sets, with each block containing 16 bits separated by a colon (:). It looks and behaves differently to an IPv4 address:

Now we know that IPv6 addresses (pun intended) exhaustion, why isn’t everyone using it yet?
Why IPv6 Adoption Has Been Slow
The adoption of IPv6 has been a challenge for many organisations due to several factors such as device and software support, network security boundaries, ease of adoption of IPv4 and skills abundance. Using IPv4, there is a comfort to knowing how things work. Within AWS itself, service support has been increasing however not as widely supported as IPv4 across services. In on-premises systems (think VPN and Direct Connect connectivity) – few organisations have adopted IPv6 as mainstream (often running IPv4 only stacks).
With all that – the biggest challenge to adoption lies in how IPv6 works and how this impacts the security boundaries for devices accessing the Internet and IPv6 addresses are accessed from the Internet.
How Resources Access the Internet in AWS IPv4
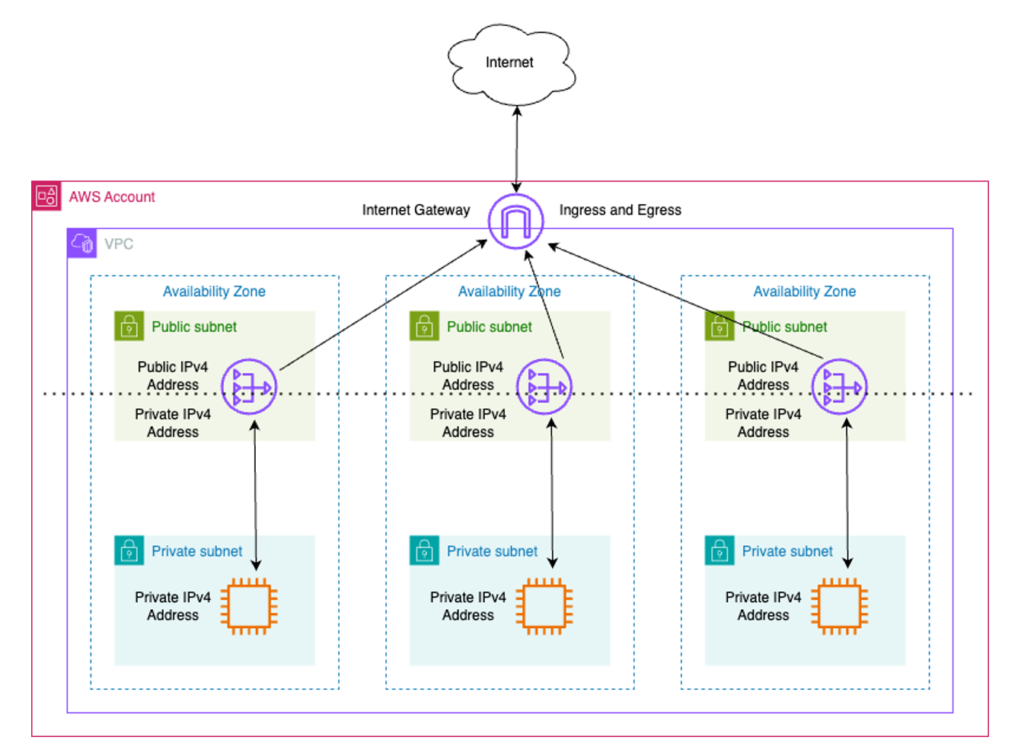
To explain how resources access the Internet in IPv4 on AWS, we need to understand the difference between Public and Private Subnets as well as the role of the Internet Gateway.
The Internet Gateway is a distributed logical router attached to a VPC that extends across all AZ’s. It allows devices with a public IP address to communicate with the Internet in either direction.
A public subnet issues 2 x IP addresses to resources placed within it. A public IPv4 address and a private IP address from the subnet within the VPC it belongs to. An example of a device that uses this pattern is a NAT Gateway. It allows access to the Internet for resources residing in private subnets.
A private subnet only issues a single private IP address to resources from its subnet. Resources within a private subnet are unable to access the Internet directly – they need to access the Internet via a NAT device such as a NAT Gateway. It must be noted however that no traffic from the Internet can initiate a connection to the resources in the private subnet. This can be seen in the diagram below:
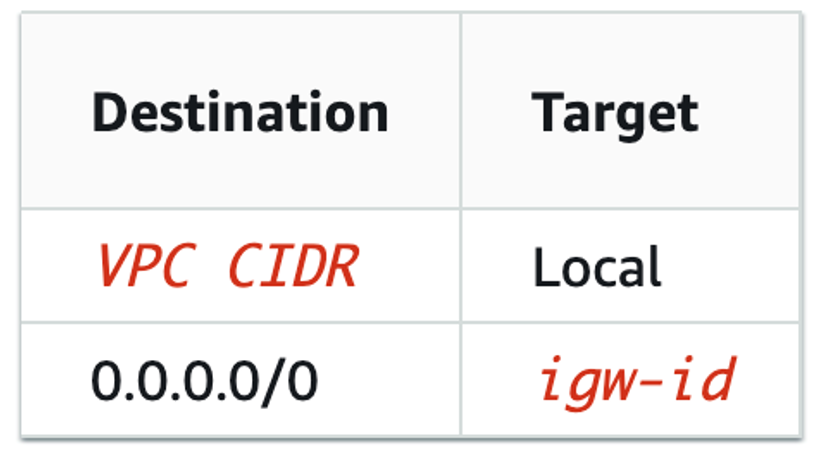
We use route-tables to determine how traffic reaches the Internet.
For the public subnets we allocate all three subnets into the same route-table with a default-route destination (0.0.0.0/0) with a next-hop target of the Internet Gateway:
For the private subnets, we allocate each subnet in each AZ to its own route table. We need to do this as each private subnet needs to point to the NAT gateway within its own AZ.

A NAT gateway is only used for outbound access to the Internet. It allows return traffic back to the private resource that initiated the connection to Internet, however sources on the Internet cannot use the NAT Gateway to initiate a connection to private resources. If we want to reach resources directly from the Internet, they must reside in a public subnet and be assigned a public IP address:

How The Flow Changes with IPv6
With IPv6, the boundary between private and public is blurred. The reason for this is that each device that is a member of an IPv6 network is directly publicly reachable via the Internet (by default). We learned that we use route-tables in AWS to determine what can and cannot reach the Internet at a network layer by using NAT Gateways and the concepts of public and private subnets. In AWS, IPv6 Internet access works differently. Resources in private subnets do not need to use NAT for accessing the Internet as the IPv6 address assigned to a resource is globally unique.
To provide security for private resources and prevent inbound access from the Internet we have several options in the form of NACL’s and Security-Groups – but what if we want to allow outbound access to the Internet for those resources for things like patching and updates? Well, AWS have a special kind of Internet Gateway called an Egress-Only Internet Gateway (EIGW). This special gateway is only for IPv6. We use this in place of NAT Gateways in private subnets for the default route (0.0.0.0/0) target. Visually it looks like this, and we can see this difference between IPv4 routes and IPv6 routes in a route-table:

As we can see above, the Egress-Only Internet Gateway allows outbound Internet access to resources in private subnets without the need to consume a NAT Gateway (and therefore a public IPv4 address). In the public subnet, any resources use the Internet Gateway to get both inbound and outbound Internet access.
Understanding Public IPv4 Assignment
When a new account is stood up, it comes with a default VPC that contains public and private subnets. There is a flag called “auto-assign public IP” set to true by default on the default VPC. Most organisations tend to use custom VPC’s as the default VPC may overlap or not align to the organisation’s CIDR allocation.
When you launch an instance in a default VPC, AWS assigns it a public IP address by default. When you launch an instance into a nondefault VPC, the subnet has an attribute that determines whether instances launched into that subnet receive a public IP address from the public IPv4 address pool. By default, AWS does not assign a public IP address to instances launched in a nondefault subnet. This is usually handled by assigning a resource an Elastic IP Address (so the public IP address remains static if the instance is stopped, hibernated, or terminated)
You can control whether your instance receives a public IP address as follows:
- Modifying the public IP addressing attribute of your subnet.
- Enabling or disabling the public IP addressing feature during launch, which overrides the subnet’s public IP addressing attribute.
A public IP address is assigned to your instance from Amazon’s pool of public IPv4 addresses and is not associated with your AWS account. When a public IP address is disassociated from your instance, it is released back into the public IPv4 address pool, and you cannot reuse it.
You cannot manually associate or disassociate a public IP (IPv4) address from your instance. Instead, in certain cases, AWS releases the public IP address from your instance, or assign it a new one:
- AWS release your instance’s public IP address when it is stopped, hibernated, or terminated. Your stopped or hibernated instance receives a new public IP address when it is started.
- AWS releases your instance’s public IP address when you associate an Elastic IP address with it. When you disassociate the Elastic IP address from your instance, it receives a new public IP address.
- If the public IP address of your instance in a VPC has been released, it will not receive a new one if there is more than one network interface attached to your instance.
- If your instance’s public IP address is released while it has a secondary private IP address that is associated with an Elastic IP address, the instance does not receive a new public IP address.
If you require a persistent public IP address that can be associated to and from instances as you require, use an Elastic IP address instead.
Important Public IPv4 Considerations
- You cannot manually disassociate the public IP address from your instance after launch. Instead, it is automatically released in certain cases, after which you cannot reuse it. If you require a persistent public IP address that you can associate or disassociate at will, assign an Elastic IP address to the instance after launch instead.
- You cannot auto-assign a public IP address if you specify more than one network interface. Additionally, you cannot override the subnet setting using the auto-assign public IP feature if you specify an existing network interface for eth0.
- The public IP addressing feature is only available during launch. However, whether you assign a public IP address to your instance during launch or not, you can associate an Elastic IP address with your instance after it is launched. You can also modify your subnet’s public IPv4 addressing behaviour.
Highlighted above is a key phrase:
“You cannot auto-assign a public IP address if you specify more than one network interface.”
Using IPv6 to Mitigate IPv4 Public IP’s
Here is where things get interesting. Where most organisations are not ready for a single IPv6 stack, running a dual-stack IPv4 and IPv6 in AWS is made much easier. When IPv6 is enabled in your VPC, all resources will be assigned new IPv6 addresses from the pool. Here is how you can keep IPv4 enabled in your VPC while using IPv6 for public ingress and Internet access within a VPC:
Enable IPv6
To associate an IPv6 CIDR block with a VPC
- Open the Amazon VPC console at https://console.aws.amazon.com/vpc/.
- In the navigation pane, choose Your VPCs.
- Select your VPC.
- Choose Actions, Edit CIDRs and then choose Add new IPv6 CIDR.
- Select one of the following options, and then choose Select CIDR:
- Amazon-provided IPv6 CIDR block – Use an IPv6 CIDR block from Amazon’s pool of IPv6 addresses. For Network Border Group, choose the group from which AWS advertises IP addresses.
- IPAM-allocated IPv6 CIDR block – Use an IPv6 CIDR block from an IPAM pool. Choose the IPAM pool and the IPv6 CIDR block.
- IPv6 CIDR owned by me – Use an IPv6 CIDR block from your IPv6 address pool (BYOIP). Choose the IPv6 address pool and the IPv6 CIDR block.
- Choose Close.
To associate an IPv6 CIDR block with a subnet
- Open the Amazon VPC console at https://console.aws.amazon.com/vpc/.
- In the navigation pane, choose Subnets.
- Select a subnet.
- Choose Actions, Edit IPv6 CIDRs and then choose Add IPv6 CIDR.
- Edit the CIDR block as needed (for example, replace the 00).
- Choose Save.
- Repeat this procedure for any other subnets in your VPC.
For more information, see IPv6 VPC CIDR blocks.
Edit Existing Route Tables
To update the route table for a public subnet
- Open the Amazon VPC console at https://console.aws.amazon.com/vpc/.
- In the navigation pane, choose Subnets. Select the public subnet. On the Route table tab, choose the route table ID to open the details page for the route table.
- Select the route table. On the Routes tab, choose Edit routes.
- Choose Add route. Choose ::/0 for Destination. Choose the ID of the internet gateway for Target.
- Choose Save changes.
To update the route table for a private subnet
- Open the Amazon VPC console at https://console.aws.amazon.com/vpc/.
- In the navigation pane, choose Egress-only internet gateways. Choose Create egress only internet gateway. Choose your VPC from VPC, and then choose Create egress only internet gateway.
For more information, see Enable outbound IPv6 traffic using an egress-only internet gateway.
- In the navigation pane, choose Subnets. Select the private subnet. On the Route table tab, choose the route table ID to open the details page for the route table.
- Select the route table. On the Routes tab, choose Edit routes.
- Choose Add route. Choose ::/0 for Destination. Choose the ID of the egress-only internet gateway for Target.
- Choose Save changes.
For more information, see Example routing options.
Update Security Groups and NACL’s
To update your inbound security group rules
- Open the Amazon VPC console at https://console.aws.amazon.com/vpc/.
- In the navigation pane, choose Security groups and select your web server security group.
- In the Inbound rules tab, choose Edit inbound rules.
- For each rule that allows IPv4 traffic, choose Add rule and configure the rule to allow the corresponding IPv6 traffic. For example, to add a rule that allows all HTTP traffic over IPv6, choose HTTP for Type and ::/0 for Source.
- When you are finished adding rules, choose Save rules.
Update your outbound security group rules
When you associate an IPv6 CIDR block with your VPC, AWS automatically add an outbound rule to the security groups for the VPC that allows all IPv6 traffic. However, if you modified the original outbound rules for your security group, this rule is not automatically added, and you must add equivalent outbound rules for IPv6 traffic.
Update Your network ACL (Access Control List) rules
When you associate an IPv6 CIDR block with a VPC, AWS automatically add rules to the default network ACL to allow IPv6 traffic. However, if you modified your default network ACL or if you have created a custom network ACL, you must manually add rules for IPv6 traffic. For more information, see Work with network ACLs.
Note:
Ensure to update any PrivateLink services to add IPv6 support:
https://aws.amazon.com/blogs/networking-and-content-delivery/expedite-your-ipv6-adoption-with-privatelink-services-and-endpoints/
Update VPC Endpoints
To create an interface endpoint for an AWS service
- Open the Amazon VPC console at https://console.aws.amazon.com/vpc/.
- In the navigation pane, choose Endpoints.
- Choose Create endpoint.
- For Service category, choose AWS services.
- For Service name, select the service. For more information, see AWS services that integrate with AWS PrivateLink.
- For VPC, select the VPC from which you will access the AWS service.
- If, in Step 34, you selected the service name for Amazon S3, and if you want to configure private DNS support, select Additional settings, Enable DNS name. When you make this selection, it also automatically selects Enable private DNS only for inbound endpoint. You can configure private DNS with an inbound Resolver endpoint only for interface endpoints for Amazon S3. If you do not have a gateway endpoint for Amazon S3 and you select Enable private DNS only for inbound endpoint, you will receive an error when you attempt the last step in this procedure.
If, in Step 34, you selected the service name for any service other than Amazon S3, Additional settings, Enable DNS name is already selected. We recommend that you keep the default. - For Subnets, select one subnet per Availability Zone from which you will access the AWS service. You cannot select multiple subnets from the same Availability Zone. We create an endpoint network interface in each subnet that you select. By default, we select IP addresses from the subnet IP address ranges and assign them to the endpoint network interfaces. To choose the IP addresses for an endpoint network interface, select Designate IP addresses and enter an IPv4 address from the subnet address range. If the endpoint service supports IPv6, you can also enter an IPv6 address from the subnet address range.
- For IP address type, choose from the following options:
- IPv4 – Assign IPv4 addresses to your endpoint network interfaces. This option is supported only if all selected subnets have IPv4 address ranges and the service accepts IPv4 requests.
- IPv6 – Assign IPv6 addresses to your endpoint network interfaces. This option is supported only if all selected subnets are IPv6 only subnets and the service accept IPv6 requests.
- Dualstack – Assign both IPv4 and IPv6 addresses to your endpoint network interfaces. This option is supported only if all selected subnets have both IPv4 and IPv6 address ranges and the service accepts both IPv4 and IPv6 requests.
- For Security groups, select the security groups to associate with the endpoint network interfaces for the VPC endpoint. By default, we associate the default security group for the VPC.
- For Policy, select Full access to allow all operations by all principals on all resources over the VPC endpoint. Otherwise, select Custom to attach a VPC endpoint policy that controls the permissions that principals have for performing actions on resources over the VPC endpoint. This option is available only if the service supports VPC endpoint policies. For more information, see Endpoint policies.
- (Optional) To add a tag, choose Add new tag and enter the tag key and the tag value.
- Choose Create endpoint.
Update Route53 DNS Records
You will now need to update your DNS records to allow for IPv6 addresses. Further guidance can be found here: https://docs.aws.amazon.com/whitepapers/latest/ipv6-on-aws/designing-dns-for-ipv6.html
At this point you will now be ready to remove IPv4 from your resources in Public Subnets and remove the NAT Gateways.
The Magic
You need to first add another Network Interface to resources in your Public Subnets, (so there are two or more Network Interfaces attached to your resources), then you can release the public address by first adding and then removing an elastic IP.
Here is a detailed step-by-step guide:
- Create a new network interface.
- Attach the new network interface to your instance. Now there will be two or more network interfaces attached to your instance. This is important. There MUST be two or more for this to work.
- Create a new Elastic IP (in the EC2 console).
- Right-click on the new EIP and associate it to the instance whose public IP you want to remove. The original public IP will be replaced by the new one.
- Now do the reverse of step 4, disassociate the EIP you have just added. At this point, right-click on the instance and select “Networking”, “Manage IP addresses”, you will see there are no public IPs on you instance any more. at this point. You must refresh the instances view otherwise you will not see this.
- The public IP is now gone for good. Even if you stop and start the instance, it will not return.
- Tidy up: delete the elastic IP you created earlier. Do not delete the new extra Network Interface. This MUST stay in place. If you remove the new / second Network Interface, then the public IP will come back the next time you stop and start the instance.
- Remove the NAT Gateways and remove the default route for IPv4 0.0.0.0/0 that references NAT Gateways (private route tables) and Internet Gateways (public route tables).
Conclusion
In summary, AWS’s recent introduction of charges for IPv4 public addresses signals a push towards IPv6 adoption, addressing the limitations of IPv4’s address exhaustion. This emphasises the need for organisations to transition to IPv6, which offers enhanced scalability and security features. Navigating this transition requires careful consideration of network architecture and the adoption of dual-stack IPv4 and IPv6 configurations to meet evolving connectivity needs.

Greg has been in the IT industry for 17+ years across a range of roles and specialties starting his career in IT within the Australian Army in the Royal Australian Signals Corps. Since then, he has worked across several industry verticals including Local and State Government, Network Integrators, Gaming, Mining, Private Cloud Providers and AWS Consultancies covering Insurance, Energy, Banking and Airline industries in addition to Public Sector (Health, Transport, Justice, Communities and Child Safety). Greg is an AWS Ambassador and AWS Community Builder for Cloud Operations. Greg specialises in network engineering, cloud infrastructure, governance and compliance, security, cloud operations, AWS Well-Architected and DevOps.