EMR on EKS by Example

EMR on EKS provides a deployment option for Amazon EMR that allows you to automate the provisioning and management of open-source big data frameworks on Amazon EKS. While a wide range of open source big data components are available in EMR on EC2, only Apache Spark is available in EMR on EKS. It is more flexible, however, that applications of different EMR versions can be run in multiple availability zones on either EC2 or Fargate. Also other types of containerized applications can be deployed on the same EKS cluster. Therefore, if you have or plan to have, for example, Apache Airflow, Apache Superset or Kubeflow as your analytics toolkits, it can be an effective way to manage big data (as well as non-big data) workloads. While Glue is more for ETL, EMR on EKS can also be used for other types of tasks such as machine learning. Moreover it allows you to build a Spark application, not a Gluish Spark application. For example, while you have to use custom connectors for Hudi or Iceberg for Glue, you can use their native libraries with EMR on EKS. In this post, we’ll discuss EMR on EKS with simple and elaborated examples.

Cluster setup and configuration

We’ll use command line utilities heavily. The following tools are required.


  • AWS CLI V2 – it is the official command line interface that enables users to interact with AWS services.

  • eksctl – it is a CLI tool for creating and managing clusters on EKS.

  • kubectl – it is a command line utility for communicating with the cluster API server.

Upload preliminary resources to S3

We need supporting files and they are created/downloaded into the config and manifests folders using a setup script – the script can be found in the project GitHub repository. The generated files will be illustrated below.


export OWNER=jaehyeon
export AWS_REGION=ap-southeast-2
export CLUSTER_NAME=emr-eks-example
export EMR_ROLE_NAME=${CLUSTER_NAME}-job-execution
export S3_BUCKET_NAME=${CLUSTER_NAME}-${AWS_REGION}
export LOG_GROUP_NAME=/${CLUSTER_NAME}

## run setup script
# – create config files, sample scripts and download necessary files
./setup.sh

tree -p config -p manifests
# config
# ├── [-rw-r–r–]  cdc_events.avsc
# ├── [-rw-r–r–]  cdc_events_s3.properties
# ├── [-rw-r–r–]  driver_pod_template.yml
# ├── [-rw-r–r–]  executor_pod_template.yml
# ├── [-rw-r–r–]  food_establishment_data.csv
# ├── [-rw-r–r–]  health_violations.py
# └── [-rw-r–r–]  hudi-utilities-bundle_2.12-0.10.0.jar
# manifests
# ├── [-rw-r–r–]  cluster.yaml
# ├── [-rw-r–r–]  nodegroup-spot.yaml
# └── [-rw-r–r–]  nodegroup.yaml

We’ll configure logging on S3 and CloudWatch so that a S3 bucket and CloudWatch log group are created. Also a Glue database is created as I encountered an error to create a Glue table when the database doesn’t exist. Finally the files in the config folder are uploaded to S3.

#### create S3 bucket/log group/glue database and upload files to S3
aws s3 mb s3://${S3_BUCKET_NAME}
aws logs create-log-group –log-group-name=${LOG_GROUP_NAME}
aws glue create-database –database-input ‘{“Name”: “datalake”}’

## upload files to S3
for f in $(ls ./config/)
  do
    aws s3 cp ./config/${f} s3://${S3_BUCKET_NAME}/config/
  done
# upload: config/cdc_events.avsc to s3://emr-eks-example-ap-southeast-2/config/cdc_events.avsc
# upload: config/cdc_events_s3.properties to s3://emr-eks-example-ap-southeast-2/config/cdc_events_s3.properties
# upload: config/driver_pod_template.yml to s3://emr-eks-example-ap-southeast-2/config/driver_pod_template.yml
# upload: config/executor_pod_template.yml to s3://emr-eks-example-ap-southeast-2/config/executor_pod_template.yml
# upload: config/food_establishment_data.csv to s3://emr-eks-example-ap-southeast-2/config/food_establishment_data.csv
# upload: config/health_violations.py to s3://emr-eks-example-ap-southeast-2/config/health_violations.py
# upload: config/hudi-utilities-bundle_2.12-0.10.0.jar to s3://emr-eks-example-ap-southeast-2/config/hudi-utilities-bundle_2.12-0.10.0.jar

Create EKS cluster and node group

We can use either command line options or a config file when creating a cluster or node group using eksctl. We’ll use config files and below shows the corresponding config files.


# ./config/cluster.yaml

apiVersion: eksctl.io/v1alpha5
kind: ClusterConfig

metadata:
  name: emr-eks-example
  region: ap-southeast-2
  tags:
    Owner: jaehyeon

# ./config/nodegroup.yaml

apiVersion: eksctl.io/v1alpha5
kind: ClusterConfig

metadata:
  name: emr-eks-example
  region: ap-southeast-2
  tags:
    Owner: jaehyeon

managedNodeGroups:
– name: nodegroup
  desiredCapacity: 2
  instanceType: m5.xlarge

eksctl creates a cluster or node group via CloudFormation. Each command will create a dedicated CloudFormation stack and it’ll take about 15 minutes. Also it generates the default kubeconfig file in the $HOME/.kube folder. Once the node group is created, we can check it using the kubectl command.

#### create cluster, node group and configure
eksctl create cluster -f ./manifests/cluster.yaml
eksctl create nodegroup -f ./manifests/nodegroup.yaml

kubectl get nodes
# NAME                                               STATUS   ROLES    AGE     VERSION
# ip-192-168-33-60.ap-southeast-2.compute.internal   Ready    <none>   5m52s   v1.21.5-eks-bc4871b
# ip-192-168-95-68.ap-southeast-2.compute.internal   Ready    <none>   5m49s   v1.21.5-eks-bc4871b

Set up Amazon EMR on EKS

As described in the Amazon EMR on EKS development guide, Amazon EKS uses Kubernetes namespaces to divide cluster resources between multiple users and applications. A virtual cluster is a Kubernetes namespace that Amazon EMR is registered with. Amazon EMR uses virtual clusters to run jobs and host endpoints. The following steps are taken in order to set up for EMR on EKS.

Enable cluster access for Amazon EMR on EKS

After creating a Kubernetes namespace for EMR (spark), it is necessary to allow Amazon EMR on EKS to access the namespace. It can be automated by eksctl and specifically the following actions are performed.


kubectl create namespace spark
eksctl create iamidentitymapping –cluster ${CLUSTER_NAME} \
  –namespace spark –service-name “emr-containers”

While the details of the role and role binding can be found in the development guide, we can see that the aws-auth ConfigMap is updated with the new Kubernetes user.

kubectl describe cm aws-auth -n kube-system
# Name:         aws-auth
# Namespace:    kube-system
# Labels:       <none>
# Annotations:  <none>

# Data
# ====
# mapRoles:
# —-
# – groups:
#   – system:bootstrappers
#   – system:nodes
#   rolearn: arn:aws:iam::<AWS-ACCOUNT-ID>:role/eksctl-emr-eks-example-nodegroup-NodeInstanceRole-15J26FPOYH0AL
#   username: system:node:{{EC2PrivateDNSName}}
# – rolearn: arn:aws:iam::<AWS-ACCOUNT-ID>:role/AWSServiceRoleForAmazonEMRContainers
#   username: emr-containers

# mapUsers:
# —-
# []

# Events:  <none>

Create an IAM OIDC identity provider for the EKS cluster

We can associate an IAM role with a Kubernetes service account. This service account can then provide AWS permissions to the containers in any pod that uses that service account. Simply put, the service account for EMR will be allowed to assume the EMR job execution role by OIDC federation – see EKS user guide for details. The job execution role will be created below. In order for the OIDC federation to work, we need to set up an IAM OIDC provider for the EKS cluster.


eksctl utils associate-iam-oidc-provider \
  –cluster ${CLUSTER_NAME} –approve

aws iam list-open-id-connect-providers –query “OpenIDConnectProviderList[1]”
# {
#     “Arn”: “arn:aws:iam::<AWS-ACCOUNT-ID>:oidc-provider/oidc.eks.ap-southeast-2.amazonaws.com/id/6F3C18F00D8610088272FEF11013B8C5”
# }

Create a job execution role

The following job execution role is created for the examples of this post. The permissions are set up to perform tasks on S3 and Glue. We’ll also enable logging on S3 and CloudWatch so that the necessary permissions are added as well. 


aws iam create-role \
  –role-name ${EMR_ROLE_NAME} \
  –assume-role-policy-document ‘{
  “Version”: “2012-10-17”,
  “Statement”: [
    {
      “Effect”: “Allow”,
      “Principal”: {
        “Service”: “elasticmapreduce.amazonaws.com”
      },
      “Action”: “sts:AssumeRole”
    }
  ]
}’

aws iam put-role-policy \
  –role-name ${EMR_ROLE_NAME} \
  –policy-name ${EMR_ROLE_NAME}-policy \
  –policy-document ‘{
    “Version”: “2012-10-17”,
    “Statement”: [
        {
            “Effect”: “Allow”,
            “Action”: [
                “s3:PutObject”,
                “s3:GetObject”,
                “s3:ListBucket”,
                “s3:DeleteObject”
            ],
            “Resource”: “*”
        },
        {
            “Effect”: “Allow”,
            “Action”: [
                “glue:*”
            ],
            “Resource”: “*”
        },
        {
            “Effect”: “Allow”,
            “Action”: [
                “logs:PutLogEvents”,
                “logs:CreateLogStream”,
                “logs:DescribeLogGroups”,
                “logs:DescribeLogStreams”
            ],
            “Resource”: [
                “arn:aws:logs:*:*:*”
            ]
        }
    ]
}’

Update the trust policy of the job execution role

As mentioned earlier, the EMR service account is allowed to assume the job execution role by OIDC federation. In order to enable it, we need to update the trust relationship of the role. We can update it as shown below.


aws emr-containers update-role-trust-policy \
  –cluster-name ${CLUSTER_NAME} \
  –namespace spark \
  –role-name ${EMR_ROLE_NAME}

aws iam get-role –role-name ${EMR_ROLE_NAME} –query “Role.AssumeRolePolicyDocument.Statement[1]”
# {
#     “Effect”: “Allow”,
#     “Principal”: {
#         “Federated”: “arn:aws:iam::<AWS-ACCOUNT-ID>:oidc-provider/oidc.eks.ap-southeast-2.amazonaws.com/id/6F3C18F00D8610088272FEF11013B8C5”
#     },
#     “Action”: “sts:AssumeRoleWithWebIdentity”,
#     “Condition”: {
#         “StringLike”: {
#             “oidc.eks.ap-southeast-2.amazonaws.com/id/6F3C18F00D8610088272FEF11013B8C5:sub”: “system:serviceaccount:spark:emr-containers-sa-*-*-<AWS-ACCOUNT-ID>-93ztm12b8wi73z7zlhtudeipd0vpa8b60gchkls78cj1q”
#         }
#     }
# }

Register Amazon EKS Cluster with Amazon EMR

We can register the Amazon EKS cluster with Amazon EMR as shown below. We need to provide the EKS cluster name and namespace.


## register EKS cluster with EMR
aws emr-containers create-virtual-cluster \
  –name ${CLUSTER_NAME} \
  –container-provider ‘{
    “id”: “‘${CLUSTER_NAME}'”,
    “type”: “EKS”,
    “info”: {
        “eksInfo”: {
            “namespace”: “spark”
        }
    }
}’

aws emr-containers list-virtual-clusters –query “sort_by(virtualClusters, &createdAt)[-1]”
# {
#     “id”: “9wvd1yhms5tk1k8chrn525z34”,
#     “name”: “emr-eks-example”,
#     “arn”: “arn:aws:emr-containers:ap-southeast-2:<AWS-ACCOUNT-ID>:/virtualclusters/9wvd1yhms5tk1k8chrn525z34”,
#     “state”: “RUNNING”,
#     “containerProvider”: {
#         “type”: “EKS”,
#         “id”: “emr-eks-example”,
#         “info”: {
#             “eksInfo”: {
#                 “namespace”: “spark”
#             }
#         }
#     },
#     “createdAt”: “2022-01-07T01:26:37+00:00”,
#     “tags”: {}
# }

We can also check the virtual cluster on the EMR console.

Examples

Food Establishment Inspection

This example is from the getting started tutorial of the Amazon EMR management guide. The PySpark script executes a simple SQL statement that counts the top 10 restaurants with the most Red violations and saves the output to S3. The script and its data source are saved to S3.


In the job request, we specify the job name, virtual cluster ID and job execution role. Also the spark submit details are specified in the job driver option where the entrypoint is set to the S3 location of the PySpark script, entry point arguments and spark submit parameters. Finally S3 and CloudWatch monitoring configuration is specified.  

export VIRTUAL_CLUSTER_ID=$(aws emr-containers list-virtual-clusters –query “sort_by(virtualClusters, &createdAt)[-1].id” –output text)
export EMR_ROLE_ARN=$(aws iam get-role –role-name ${EMR_ROLE_NAME} –query Role.Arn –output text)

## create job request
cat << EOF > ./request-health-violations.json
{
    “name”: “health-violations”,
    “virtualClusterId”: “${VIRTUAL_CLUSTER_ID}”,
    “executionRoleArn”: “${EMR_ROLE_ARN}”,
    “releaseLabel”: “emr-6.2.0-latest”,
    “jobDriver”: {
        “sparkSubmitJobDriver”: {
            “entryPoint”: “s3://${S3_BUCKET_NAME}/config/health_violations.py”,
            “entryPointArguments”: [
                “–data_source”, “s3://${S3_BUCKET_NAME}/config/food_establishment_data.csv”,
                “–output_uri”, “s3://${S3_BUCKET_NAME}/output”
            ],
            “sparkSubmitParameters”: “–conf spark.executor.instances=2 \
                –conf spark.executor.memory=2G \
                –conf spark.executor.cores=1 \
                –conf spark.driver.cores=1 \
                –conf spark.driver.memory=2G”
        }
    },
    “configurationOverrides”: {
        “monitoringConfiguration”: {
            “cloudWatchMonitoringConfiguration”: {
                “logGroupName”: “${LOG_GROUP_NAME}”,
                “logStreamNamePrefix”: “health”
            },
            “s3MonitoringConfiguration”: {
                “logUri”: “s3://${S3_BUCKET_NAME}/logs/”
            }
        }
    }
}
EOF

aws emr-containers start-job-run \
    –cli-input-json file://./request-health-violations.json

Once a job run is started, it can be checked under the virtual cluster section of the EMR console.

When we click the View logs link, it launches the Spark History Server on a new tab.

As configured, the container logs of the job can be found in CloudWatch.

Lorem ipsum dolor sit amet, consectetur adipiscing elit. Ut elit tellus, luctus nec ullamcorper mattis, pulvinar dapibus leo.

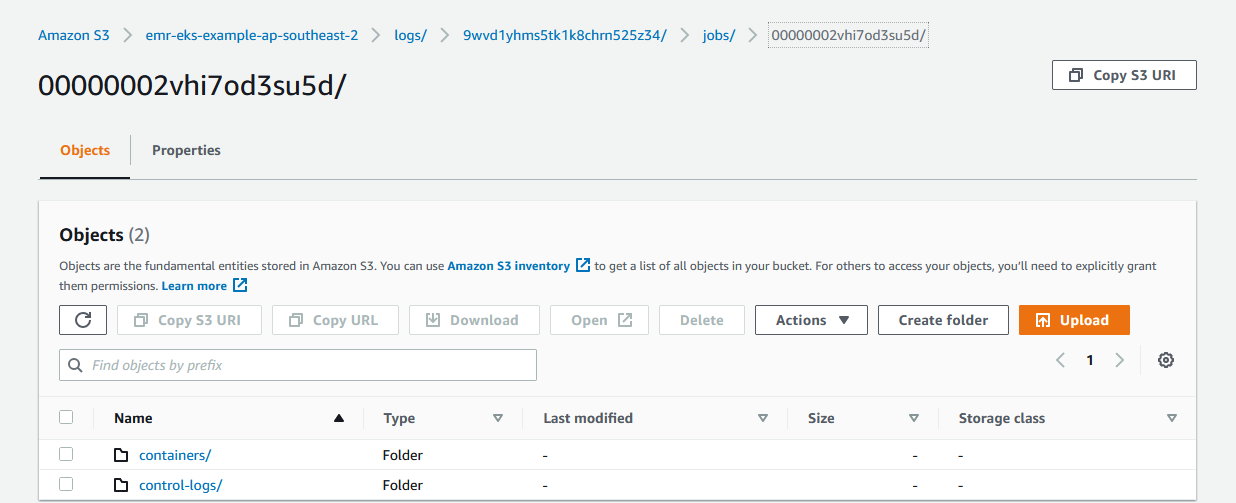
Also the logs for the containers (spark driver and executor) and control-logs (job runner) can be found in S3.
Once the job completes, we can check the output from S3 as shown below.


export OUTPUT_FILE=$(aws s3 ls s3://${S3_BUCKET_NAME}/output/ | grep .csv | awk ‘{print $4}’)
aws s3 cp s3://${S3_BUCKET_NAME}/output/${OUTPUT_FILE} – | head -n 15
# name,total_red_violations
# SUBWAY,322
# T-MOBILE PARK,315
# WHOLE FOODS MARKET,299
# PCC COMMUNITY MARKETS,251
# TACO TIME,240
# MCDONALD‘S,177
# THAI GINGER,153
# SAFEWAY INC #1508,143
# TAQUERIA EL RINCONSITO,134
# HIMITSU TERIYAKI,128

Hudi DeltaStreamer

In an earlier post, we discussed a Hudi table generation using the DeltaStreamer utility as part of a CDC-based data ingestion solution. In that exercise, we executed the spark job in an EMR cluster backed by EC2 instances. We can run the spark job in our EKS cluster.


We can configure to run the executors in spot instances in order to save cost. A spot node group can be created by the following configuration file.


# ./manifests/nodegroup-spot.yaml


apiVersion: eksctl.io/v1alpha5
kind: ClusterConfig

metadata:
  name: emr-eks-example
  region: ap-southeast-2
  tags:
    Owner: jaehyeon

managedNodeGroups:
– name: nodegroup-spot
  desiredCapacity: 3
  instanceTypes:
  – m5.xlarge
  – m5a.xlarge
  – m4.xlarge
  spot: true

Once the spot node group is created, we can see 3 instances are added to the EKS node with the SPOT capacity type.


eksctl create nodegroup -f ./manifests/nodegroup-spot.yaml

kubectl get nodes \
  –label-columns=eks.amazonaws.com/nodegroup,eks.amazonaws.com/capacityType \
  –sort-by=.metadata.creationTimestamp
# NAME                                                STATUS   ROLES    AGE    VERSION               NODEGROUP        CAPACITYTYPE
# ip-192-168-33-60.ap-southeast-2.compute.internal    Ready    <none>   52m    v1.21.5-eks-bc4871b   nodegroup        ON_DEMAND
# ip-192-168-95-68.ap-southeast-2.compute.internal    Ready    <none>   51m    v1.21.5-eks-bc4871b   nodegroup        ON_DEMAND
# ip-192-168-79-20.ap-southeast-2.compute.internal    Ready    <none>   114s   v1.21.5-eks-bc4871b   nodegroup-spot   SPOT
# ip-192-168-1-57.ap-southeast-2.compute.internal     Ready    <none>   112s   v1.21.5-eks-bc4871b   nodegroup-spot   SPOT
# ip-192-168-34-249.ap-southeast-2.compute.internal   Ready    <none>   97s    v1.21.5-eks-bc4871b   nodegroup-spot   SPOT

The driver and executor pods should be created in different nodes and it can be controlled by Pod Template. Below the driver and executor have a different node selector and they’ll be assigned based on the capacity type label specified in the node selector.

# ./config/driver_pod_template.yml
apiVersion: v1
kind: Pod
spec:
  nodeSelector:
    eks.amazonaws.com/capacityType: ON_DEMAND

# ./config/executor_pod_template.yml
apiVersion: v1
kind: Pod
spec:
  nodeSelector:
    eks.amazonaws.com/capacityType: SPOT

The job request for the DeltaStreamer job can be found below. Note that, in the entrypoint, we specified the latest Hudi utilities bundle (0.10.0) from S3 instead of the pre-installed Hudi 0.8.0. It is because Hudi 0.8.0 supports JDBC based Hive sync only while Hudi 0.9.0+ supports multiple Hive sync modes including Hive metastore. EMR on EKS doesn’t run HiveServer2 so that JDBC based Hive sync doesn’t work. Instead we can specify Hive sync based on Hive metastore because Glue data catalog can be used as Hive metastore. Therefore we need a newer version of the Hudi library in order to register the resulting Hudi table to Glue data catalog. Also, in the application configuration, we configured to use Glue data catalog as the Hive metastore and the driver/executor pod template files are specified.

export VIRTUAL_CLUSTER_ID=$(aws emr-containers list-virtual-clusters –query “sort_by(virtualClusters, &createdAt)[-1].id” –output text)
export EMR_ROLE_ARN=$(aws iam get-role –role-name ${EMR_ROLE_NAME} –query Role.Arn –output text)

## create job request
cat << EOF > ./request-cdc-events.json
{
    “name”: “cdc-events”,
    “virtualClusterId”: “${VIRTUAL_CLUSTER_ID}”,
    “executionRoleArn”: “${EMR_ROLE_ARN}”,
    “releaseLabel”: “emr-6.4.0-latest”,
    “jobDriver”: {
        “sparkSubmitJobDriver”: {
            “entryPoint”: “s3://${S3_BUCKET_NAME}/config/hudi-utilities-bundle_2.12-0.10.0.jar”,
            “entryPointArguments”: [
              “–table-type”, “COPY_ON_WRITE”,
              “–source-ordering-field”, “__source_ts_ms”,
              “–props”, “s3://${S3_BUCKET_NAME}/config/cdc_events_s3.properties”,
              “–source-class”, “org.apache.hudi.utilities.sources.JsonDFSSource”,
              “–target-base-path”, “s3://${S3_BUCKET_NAME}/hudi/cdc-events/”,
              “–target-table”, “datalake.cdc_events”,
              “–schemaprovider-class”, “org.apache.hudi.utilities.schema.FilebasedSchemaProvider”,
              “–enable-hive-sync”,
              “–min-sync-interval-seconds”, “60”,
              “–continuous”,
              “–op”, “UPSERT”
            ],
            “sparkSubmitParameters”: “–class org.apache.hudi.utilities.deltastreamer.HoodieDeltaStreamer \
            –jars local:///usr/lib/spark/external/lib/spark-avro_2.12-3.1.2-amzn-0.jar,s3://${S3_BUCKET_NAME}/config/hudi-utilities-bundle_2.12-0.10.0.jar \
            –conf spark.driver.cores=1 \
            –conf spark.driver.memory=2G \
            –conf spark.executor.instances=2 \
            –conf spark.executor.memory=2G \
            –conf spark.executor.cores=1 \
            –conf spark.sql.catalogImplementation=hive \
            –conf spark.serializer=org.apache.spark.serializer.KryoSerializer”
        }
    },
    “configurationOverrides”: {
        “applicationConfiguration”: [
            {
                “classification”: “spark-defaults”,
                “properties”: {
                  “spark.hadoop.hive.metastore.client.factory.class”:”com.amazonaws.glue.catalog.metastore.AWSGlueDataCatalogHiveClientFactory”,
                  “spark.kubernetes.driver.podTemplateFile”:”s3://${S3_BUCKET_NAME}/config/driver_pod_template.yml”,
                  “spark.kubernetes.executor.podTemplateFile”:”s3://${S3_BUCKET_NAME}/config/executor_pod_template.yml”
                }
            }
        ],
        “monitoringConfiguration”: {
            “cloudWatchMonitoringConfiguration”: {
                “logGroupName”: “${LOG_GROUP_NAME}”,
                “logStreamNamePrefix”: “cdc”
            },
            “s3MonitoringConfiguration”: {
                “logUri”: “s3://${S3_BUCKET_NAME}/logs/”
            }
        }
    }
}
EOF

aws emr-containers start-job-run \
    –cli-input-json file://./request-cdc-events.json

Once the job run is started, we can check it as shown below.

aws emr-containers list-job-runs –virtual-cluster-id ${VIRTUAL_CLUSTER_ID} –query “jobRuns[?name==’cdc-events’]”
# [
#     {
#         “id”: “00000002vhi9hivmjk5”,
#         “name”: “cdc-events”,
#         “virtualClusterId”: “9wvd1yhms5tk1k8chrn525z34”,
#         “arn”: “arn:aws:emr-containers:ap-southeast-2:<AWS-ACCOUNT-ID>:/virtualclusters/9wvd1yhms5tk1k8chrn525z34/jobruns/00000002vhi9hivmjk5”,
#         “state”: “RUNNING”,
#         “clientToken”: “63a707e4-e5bc-43e4-b11a-5dcfb4377fd3”,
#         “executionRoleArn”: “arn:aws:iam::<AWS-ACCOUNT-ID>:role/emr-eks-example-job-execution”,
#         “releaseLabel”: “emr-6.4.0-latest”,
#         “createdAt”: “2022-01-07T02:09:34+00:00”,
#         “createdBy”: “arn:aws:sts::<AWS-ACCOUNT-ID>:assumed-role/AWSReservedSSO_AWSFullAccountAdmin_fb6fa00561d5e1c2/jaehyeon.kim@cevo.com.au”,
#         “tags”: {}
#     }
# ]

With kubectl, we can check there are 1 driver, 2 executors and 1 job runner pods.

kubectl get pod -n spark
# NAME                                                            READY   STATUS    RESTARTS   AGE
# pod/00000002vhi9hivmjk5-wf8vp                                   3/3     Running   0          14m
# pod/delta-streamer-datalake-cdcevents-5397917e324dea27-exec-1   2/2     Running   0          12m
# pod/delta-streamer-datalake-cdcevents-5397917e324dea27-exec-2   2/2     Running   0          12m
# pod/spark-00000002vhi9hivmjk5-driver                            2/2     Running   0          13m

Also we can see the driver pod runs in the on-demand node group while the executor and job runner pods run in the spot node group.

## driver runs in the on demand node
for n in $(kubectl get nodes -l eks.amazonaws.com/capacityType=ON_DEMAND –no-headers | cut -d ” ” -f1)
  do echo “Pods on instance ${n}:”;kubectl get pods -n spark  –no-headers –field-selector spec.nodeName=${n}
    echo
  done
# Pods on instance ip-192-168-33-60.ap-southeast-2.compute.internal:
# No resources found in spark namespace.

# Pods on instance ip-192-168-95-68.ap-southeast-2.compute.internal:
# spark-00000002vhi9hivmjk5-driver   2/2   Running   0     17m

## executor and job runner run in the spot node
for n in $(kubectl get nodes -l eks.amazonaws.com/capacityType=SPOT –no-headers | cut -d ” ” -f1)
  do echo “Pods on instance ${n}:”;kubectl get pods -n spark  –no-headers –field-selector spec.nodeName=${n}
    echo
  done
# Pods on instance ip-192-168-1-57.ap-southeast-2.compute.internal:
# delta-streamer-datalake-cdcevents-5397917e324dea27-exec-2   2/2   Running   0     16m

# Pods on instance ip-192-168-34-249.ap-southeast-2.compute.internal:
# 00000002vhi9hivmjk5-wf8vp   3/3   Running   0     18m

# Pods on instance ip-192-168-79-20.ap-southeast-2.compute.internal:
# delta-streamer-datalake-cdcevents-5397917e324dea27-exec-1   2/2   Running   0     16m

The Hudi utility will register a table in the Glue data catalog and it can be checked as shown below.

aws glue get-table –database-name datalake –name cdc_events \
    –query “Table.[DatabaseName, Name, StorageDescriptor.Location, CreateTime, CreatedBy]”
# [
#     “datalake”,
#     “cdc_events”,
#     “s3://emr-eks-example-ap-southeast-2/hudi/cdc-events”,
#     “2022-01-07T13:18:49+11:00”,
#     “arn:aws:sts::590312749310:assumed-role/emr-eks-example-job-execution/aws-sdk-java-1641521928075”
# ]

Finally the details of the table can be queried in Athena.

Summary

In this post, we discussed how to run spark jobs on EKS. First we created an EKS cluster and a node group using eksctl. Then we set up EMR on EKS. A simple PySpark job that shows the basics of EMR on EKS is illustrated and a more realistic example of running Hudi DeltaStreamer utility is demonstrated where the driver and executors are assigned in different node groups.

Enjoyed this blog?

Share it with your network!

Move faster with confidence