Local Development of AWS Glue 3.0 and Later

In an earlier post, I demonstrated how to set up a local development environment for AWS Glue 1.0 and 2.0 using a docker image that is published by the AWS Glue team and the Visual Studio Code Remote – Containers extension. Recently AWS Glue 3.0 was released but a docker image for this version is not published. In this post, I’ll illustrate how to create a development environment for AWS Glue 3.0 (and later versions) by building a custom docker image.

Glue Base Docker Image

The Glue base images are built while referring to the official AWS Glue Python local development documentation. For example, the latest image that targets Glue 3.0 is built on top of the official Python image on the latest stable Debian version (python:3.7.12-bullseye). After installing utilities (zip and AWS CLI V2), Open JDK 8 is installed. Then Maven, Spark and Glue Python libraries (aws-glue-libs) are added to the /opt directory and Glue dependencies are downloaded by sourcing glue-setup.sh. It ends up downloading default Python packages and updating the GLUE_HOME and PYTHONPATH environment variables. The Dockerfile is shown below and it can also be found in the project GitHub repository.


## glue-base/3.0/Dockerfile

FROM python:3.7.12-bullseye

## Install utils
RUN apt-get update && apt-get install -y zip

RUN curl “https://awscli.amazonaws.com/awscli-exe-linux-x86_64.zip” -o “awscliv2.zip” \
    && unzip awscliv2.zip && ./aws/install

## Install Open JDK 8
RUN apt-get update \
  && apt-get install -y software-properties-common \
  && apt-add-repository ‘deb http://security.debian.org/debian-security stretch/updates main’ \
  && apt-get update \
  && apt-get install -y openjdk-8-jdk

## Create environment variables
ENV M2_HOME=/opt/apache-maven-3.6.0
ENV SPARK_HOME=/opt/spark-3.1.1-amzn-0-bin-3.2.1-amzn-3
ENV PATH=“${PATH}:${M2_HOME}/bin”

## Add Maven, Spark and AWS Glue Libs to /opt
RUN curl -SsL https://aws-glue-etl-artifacts.s3.amazonaws.com/glue-common/apache-maven-3.6.0-bin.tar.gz \
    | tar -C /opt –warning=no-unknown-keyword -xzf –
RUN curl -SsL https://aws-glue-etl-artifacts.s3.amazonaws.com/glue-3.0/spark-3.1.1-amzn-0-bin-3.2.1-amzn-3.tgz \
    | tar -C /opt –warning=no-unknown-keyword -xf –
RUN curl -SsL https://github.com/awslabs/aws-glue-libs/archive/refs/tags/v3.0.tar.gz \
    | tar -C /opt –warning=no-unknown-keyword -xzf –

# Install Glue dependencies
RUN cd /opt/aws-glue-libs-3.0/bin/ \
    && bash -c “source glue-setup.sh”

## Add default Python packages
COPY ./requirements.txt /tmp/requirements.txt
RUN pip install -r /tmp/requirements.txt

## Update Python path
ENV GLUE_HOME=/opt/aws-glue-libs-3.0
ENV PYTHONPATH=$GLUE_HOME:$SPARK_HOME/python/lib/pyspark.zip:$SPARK_HOME/python/lib/py4j-0.10.9-src.zip:$SPARK_HOME/python

EXPOSE 4040

CMD [“bash”]


It is published to the glue-base repository of Cevo Australia’s public ECR registry with the following tags. Later versions of Glue base images will be published with relevant tags.

  • public.ecr.aws/cevoaustralia/glue-base:latest

  • public.ecr.aws/cevoaustralia/glue-base:3.0

Usage

The Glue base image can be used for running a pyspark shell or submitting a spark application as shown below. For the spark application, I assume the project repository is mapped to the container’s /tmp folder. The Glue Python libraries also support pytest and it’ll be discussed later in the post. 


docker run –rm -it \
  -v $HOME/.aws:/root/.aws \
  public.ecr.aws/cevoaustralia/glue-base bash -c “/opt/aws-glue-libs-3.0/bin/gluepyspark”

docker run –rm -it \
  -v $HOME/.aws:/root/.aws \
  -v $PWD:/tmp/glue-vscode \
  public.ecr.aws/cevoaustralia/glue-base bash -c “/opt/aws-glue-libs-3.0/bin/gluesparksubmit /tmp/glue-vscode/example.py”

Extend Glue Base Image

We can extend the Glue base image using the VSCode remote containers extension. The configuration for the extension can be found in the .devcontainer folder. The folder includes the Dockerfile for the development docker image and remote container configuration file (devcontainer.json). The other contents include the source for the Glue base image and materials for pytest, spark-submit and pytest demonstrations. These will be illustrated below.


.
├── .devcontainer
│   ├── pkgs
│   │   └── dev.txt
│   ├── Dockerfile
│   └── devcontainer.json
├── .gitignore
├── README.md
├── example.py
├── execute.sh
├── glue-base
│   └── 3.0
│       ├── Dockerfile
│       └── requirements.txt
├── src
│   └── utils.py
└── tests
    ├── __init__.py
    ├── conftest.py
    └── test_utils.py

Development Docker Image

The Glue base Docker image runs as the root user and it is not convenient to write code with it. Therefore a non-root user is created whose user name corresponds to the logged-in user’s user name – the USERNAME argument will be set accordingly in devcontainer.json. Next the sudo program is installed and the non-root user is added to the Sudo group. Note the Python Glue library’s executables are configured to run with the root user so that the sudo program is necessary to run those executables. Finally it installs additional development Python packages.


## .devcontainer/Dockerfile

FROM public.ecr.aws/i0m5p1b5/glue-base:3.0

ARG USERNAME
ARG USER_UID
ARG USER_GID

## Create non-root user
RUN groupadd –gid $USER_GID $USERNAME \
    && useradd –uid $USER_UID –gid $USER_GID -m $USERNAME

## Add sudo support in case we need to install software after connecting
RUN apt-get update \
    && apt-get install -y sudo nano \
    && echo $USERNAME ALL=\(root\) NOPASSWD:ALL > /etc/sudoers.d/$USERNAME \
    && chmod 0440 /etc/sudoers.d/$USERNAME

## Install Python packages
COPY ./pkgs /tmp/pkgs
RUN pip install -r /tmp/pkgs/dev.txt

Container Configuration

The development container will be created by building an image from the Dockerfile illustrated above. The logged-in user’s user name is provided to create a non-root user and the container is set to run as the user as well. And 2 visual studio code extensions are installed – Python and Prettier. Also the current folder is mounted to the container’s workspace folder and 2 additional folders are mounted – they are to share AWS credentials and SSH keys. Note that AWS credentials are mounted to /root/.aws because the Python Glue library’s executables will be run as the root user. Then the port 4040 is set to be forwarded, which is used for the Spark UI. Finally additional editor settings are added at the end.


// .devcontainer/devcontainer.json

{
  “name”: “glue”,
  “build”: {
    “dockerfile”: “Dockerfile”,
    “args”: {
      “USERNAME”: “${localEnv:USER}”,
      “USER_UID”: “1000”,
      “USER_GID”: “1000”
    }
  },
  “containerUser”: “${localEnv:USER}”,
  “extensions”: [
    “ms-python.python”,
    “esbenp.prettier-vscode”
  ],
  “workspaceMount”: “source=${localWorkspaceFolder},target=${localEnv:HOME}/glue-vscode,type=bind,consistency=cached”,
  “workspaceFolder”: “${localEnv:HOME}/glue-vscode”,
  “forwardPorts”: [4040],
  “mounts”: [
    “source=${localEnv:HOME}/.aws,target=/root/.aws,type=bind,consistency=cached”,
    “source=${localEnv:HOME}/.ssh,target=${localEnv:HOME}/.ssh,type=bind,consistency=cached”
  ],
  “settings”: {
    “terminal.integrated.profiles.linux”: {
      “bash”: {
        “path”: “/bin/bash”
      }
    },
    “terminal.integrated.defaultProfile.linux”: “bash”,
    “editor.formatOnSave”: true,
    “editor.defaultFormatter”: “esbenp.prettier-vscode”,
    “editor.tabSize”: 2,
    “python.testing.pytestEnabled”: true,
    “python.linting.enabled”: true,
    “python.linting.pylintEnabled”: false,
    “python.linting.flake8Enabled”: false,
    “python.formatting.provider”: “black”,
    “python.formatting.blackPath”: “black”,
    “python.formatting.blackArgs”: [“–line-length”, “100”],
    “[python]”: {
      “editor.tabSize”: 4,
      “editor.defaultFormatter”: “ms-python.python”
    }
  }
}

Launch Container

The development container can be run by executing the following command in the command palette. 

  • Remote-Containers: Open Folder in Container…

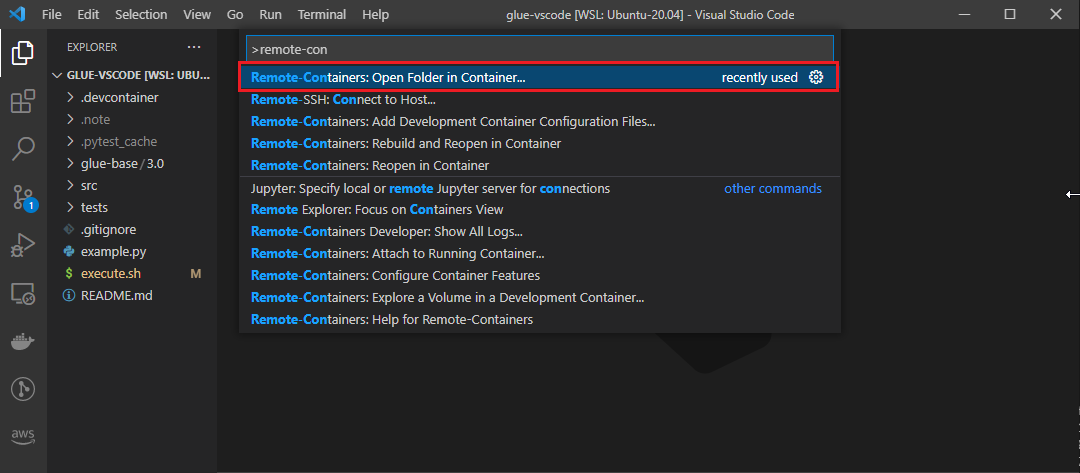
Once the development container is ready, the workspace folder will be open within the container.

Examples

I’ve created a script (execute.sh) to run the executables easily. The main command indicates which executable to run and possible values are pyspark, spark-submit and pytest. Below shows some example commands.


./execute.sh pyspark # pyspark
./execute.sh spark-submit example.py # spark submit
./execute.sh pytest -svv # pytest

## execute.sh

#!/usr/bin/env bash

## remove first argument
execution=$1
echo “execution type – $execution

shift 1
echo $@

## set up command
if [ $execution == ‘pyspark’ ]; then
  sudo su -c $GLUE_HOME/bin/gluepyspark”
elif [ $execution == ‘spark-submit’ ]; then
  sudo su -c $GLUE_HOME/bin/gluesparksubmit $@
elif [ $execution == ‘pytest’ ]; then
  sudo su -c $GLUE_HOME/bin/gluepytest $@
else
  echo “unsupported execution type – $execution
  exit 1
fi

Pyspark

Using the script above, we can launch PySpark. A screenshot of the PySpark shell can be found below.


./execute.sh pyspark

Spark Submit

Below shows one of the Python samples in the Glue documentation. It pulls 3 data sets from a database called legislators. Then they are joined to create a history data set (l_history) and saved into S3.


./execute.sh spark-submit example.py


## example.py

from awsglue.dynamicframe import DynamicFrame
from awsglue.transforms import Join
from awsglue.utils import getResolvedOptions
from pyspark.context import SparkContext
from awsglue.context import GlueContext

glueContext = GlueContext(SparkContext.getOrCreate())

DATABASE = “legislators”
OUTPUT_PATH = “s3://glue-python-samples-fbe445ee/output_dir”

## create dynamic frames from data catalog
persons: DynamicFrame = glueContext.create_dynamic_frame.from_catalog(
    database=DATABASE, table_name=“persons_json”
)

memberships: DynamicFrame = glueContext.create_dynamic_frame.from_catalog(
    database=DATABASE, table_name=“memberships_json”
)

orgs: DynamicFrame = glueContext.create_dynamic_frame.from_catalog(
    database=DATABASE, table_name=“organizations_json”
)

## manipulate data
orgs = (
    orgs.drop_fields([“other_names”, “identifiers”])
    .rename_field(“id”, “org_id”)
    .rename_field(“name”, “org_name”)
)

l_history: DynamicFrame = Join.apply(
    orgs, Join.apply(persons, memberships, “id”, “person_id”), “org_id”, “organization_id”
)
l_history = l_history.drop_fields([“person_id”, “org_id”])

l_history.printSchema()

## write to s3
glueContext.write_dynamic_frame.from_options(
    frame=l_history,
    connection_type=“s3”,
    connection_options={“path”: f”{OUTPUT_PATH}/legislator_history”},
    format=“parquet”,
)

When the execution completes, we can see the joined data set is stored as a parquet file in the output S3 bucket.

Note that we can monitor and inspect Spark job executions in the Spark UI on port 4040.

Pytest

We can test a function that deals with a DynamicFrame. Below shows a test case for a simple function that filters a DynamicFrame based on a column value.


./execute.sh pytest -svv


## src/utils.py
from awsglue.dynamicframe import DynamicFrame

def filter_dynamic_frame(dyf: DynamicFrame, column_name: str, value: int):
    return dyf.filter(f=lambda x: x[column_name] > value)


## tests/conftest.py
from pyspark.context import SparkContext
from awsglue.context import GlueContext
import pytest

@pytest.fixture(scope=”session”)
def glueContext():
    sparkContext = SparkContext()
    glueContext = GlueContext(sparkContext)
    yield glueContext
    sparkContext.stop()


## tests/test_utils.py
from typing import List
from awsglue.dynamicframe import DynamicFrame
import pandas as pd
from src.utils import filter_dynamic_frame

def _get_sorted_data_frame(pdf: pd.DataFrame, columns_list: List[str] = None):
    if columns_list is None:
        columns_list = list(pdf.columns.values)
    return pdf.sort_values(columns_list).reset_index(drop=True)


def test_filter_dynamic_frame_by_value(glueContext):
    spark = glueContext.spark_session

    input = spark.createDataFrame(
        [(“charly”, 15), (“fabien”, 18), (“sam”, 21), (“sam”, 25), (“nick”, 19), (“nick”, 40)],
        [“name”, “age”],
    )

    expected_output = spark.createDataFrame(
        [(“sam”, 25), (“sam”, 21), (“nick”, 40)],
        [“name”, “age”],
    )

    real_output = filter_dynamic_frame(DynamicFrame.fromDF(input, glueContext, “output”), “age”, 20)

    pd.testing.assert_frame_equal(
        _get_sorted_data_frame(real_output.toDF().toPandas(), [“name”, “age”]),
        _get_sorted_data_frame(expected_output.toPandas(), [“name”, “age”]),
        check_like=True,
    )

Conclusion


In this post, I demonstrated how to build local development environments for AWS Glue 3.0 and later using a custom docker image and the Visual Studio Code Remote – Containers extension. Then examples of launching Pyspark shells, submitting an application and running a test are shown. I hope this post is useful to develop and test Glue ETL scripts locally.

Enjoyed this blog?

Share it with your network!

You may also like

Move faster with confidence