If you have been using AWS Amplify in recent years, you are likely very familiar with the fact that it provides full-stack app development by offering a tooling-first experience using CLI/Console-based interactive workflow to create a backend. However, you still could use other channels such as Amplify Admin UI or direct editing the generated JSON files. AWS Amplify CLI is the primary used for configuring backend services such as authentication, storage and APIs to your front-end features.
While AWS Amplify offers many advantages for building and deploying web and mobile full-stack applications, there are some limitations that prevented developers from leveraging AWS Amplify further. The first one that comes to my mind is customisation. At some point, when your application scales and require very specific requirements, AWS Amplify abstraction layer turns out to be a challenge to implement. However, AWS addressed this issue and various others, based on feedback from dev community, launching a new generation for Amplify.
AWS Amplify Gen 2
Amplify Gen 2 transitions to a Typescript DX, allowing developers to build full-stack cloud applications using just Typescript, while the cloud infrastructure is automatically deployed based on the declared application code. With Gen 2, you can get the same back-end features as Gen 1 plus additional features, but this time its libraries are built with AWS Cloud Development Kit (AWS CDK).
Features/Benefits
There are a range of features and benefits you can leverage from Amplify Gen 2, here I listed some I think would be the most useful
- World of Typescript: By offering a Typescript experience, developers can leverage its features such as early error detection, IntelliSense, in-line documentation, type inference and many others.
- Backend entire built in CDK: You can add custom AWS resources to Amplify using AWS CDK constructs. Any infrastructure defined through the AWS CDK code is deployed along with the Amplify app backend.
- Local deployment: Local deployments will get easier with the Gen 2 cloud sandbox environments. Each developer can now deploy its own sandbox stack on CloudFormation and test with local front-end.
- AI/ML Predictions: A range of AI and ML cloud services to integrate in your application, for instance: Conversion of text to speech, transcribing audio to text, etc. For further information: Amplify-AIML
- Full-stack workflows: You have the option to create full-stack repositories, separate frontend and backend into their own repositories or even create a mono-repo setup: Amplify-Workflows
Use Cases
Web Transactions would be good cases to utilise Gen 2, as you can efficiently deploy full stack applications and leverage UI libraries, such as automatic form generator and authenticator.
Alternatives
- AWS CDK: CDK is highly effective and beneficial for managing infra as code. CDK allows you to create reusable constructs that encapsulate configuration and provide a way to share and reuse them. Good cases for shared backend resources across multiple applications.
- SST.dev: SST.dev Serverless Stack Toolkit is an open-source infrastructure-as-code framework. It is an extension of AWS CDK with a higher level of abstraction. SST was also covered by Cevo with some examples in our blog library, which you can check here: Cevo-Intro to SST
Building a full-stack application
In this tutorial, we will build a React-Typescript-Vite full stack application integrated with Build UI form.
1 - Setup
To speed things up, let’s use Amplify-Quickstart to setup the repository, initial code and deployment. This template provides a TODO list creator application with Authentication and Database integration. For our tutorial, we will customise this to be an Event CRUD application with Amplify Form UI and Material UI data-table integration.
After following the steps from the Quickstart example, you should be able to run localhost and verify TODO list application provided.
Project Structure

The first thing you will notice with Gen 2 is the creation of backend code in Typescript files, which, in this case, you already have initial configuration for Model schemas and authentication. Any customisation you apply on the backend must be declared later in the backend.ts file.
					import { defineBackend } from "@aws-amplify/backend";
import { auth } from "./auth/resource";
import { data } from "./data/resource";

defineBackend({
  auth,
  data,
});
2 - Model and table customisation
Through the schema defined, Amplify will create a database table with the attributes specified. Schema class defines backend data models, custom queries, mutation and subscriptions. For this tutorial, let’s adapt the current Schema model to our Event application.
					const schema = a.schema({
  Address: a.customType({
    address: a.string(),
    state: a.string(),
    country: a.string(),
    postcode: a.string()
  }),
  PrivacySetting: a.enum(['PRIVATE', 'FRIENDS_ONLY', 'PUBLIC']),
  Event: a
    .model({
      address: a.ref('Address'),
      name: a.string(),
      category: a.string(),
      datetime: a.string(),
      privacySetting: a.ref('PrivacySetting')
    })
    .authorization(allow => [allow.authenticated()])
  // Isolate the data as "user-authenticated-based-authorization" per user basis
});
3 - Test your changes local with Sandboxes
With any changes on the backend, you are required to update amplify_outputs.json file. The harder path (not that hard) would be pushing your code to the repository, then downloading from AWS Console. Although, Amplify comes with a better alternative, which is deploying personal sandboxes into CloudFormation.
By running npx ampx sandbox on your terminal, Amplify will deploy a stack on CloudFormation with the resources configured in the amplify/folder. This will update the amplify_outputs.json file of your local repository, allowing you to run the frontend locally with the latest changes. To know more check out on: Amplify-Sandboxes.
4 - Consuming back-end
With back-end model defined, Event table can now be consumed by the front-end. But first you need to generate the Schema client.
					import { generateClient } from "aws-amplify/data";
import type { Schema } from "../amplify/data/resource";
export const clientSchema = generateClient<Schema>();
Now, you can perform CRUD operation into the Event schema. As you can see below, Amplify provides functions to consume GraphQL APIs, saving time and complexity on development.
					useEffect(() => {
    clientSchema.models.Event.observeQuery().subscribe({
      next: data => setEvents([...data.items])
    });
  }, []);

  function createRandomEvent() {
    const randomNumber = getRandomNumber();

    clientSchema.models.Event.create({
      name: `Evet name-${randomNumber}`,
      category: 'Concert',
      datetime: '15/02/2024',
      privacySetting: 'FRIENDS_ONLY',
      address: {
        address: 'Street',
        state: 'VIC'
        country: 'Australia',
        postcode: '3000'
      }
    });
  }

  function deleteEvent(id: string) {
    clientSchema.models.Event.delete({ id });
  }
5 - Generate Forms from your Schemas
You can now generate React forms from your data models by running “npx ampx generate forms” command. This will generate and update forms for each model defined in your schema in a folder called ui-components or in another folder that you specify. Also, it will generate GraphQL APIs functions to submit your forms to the backend.
From the Event schema the following forms were generated

After that the integration to your frontend is easy:
					import EventCreateForm from '../../ui-components/EventCreateForm';
import { Wrapper } from './styled';

const EventForm: React.FC = ({}) => {
    return (
        <Wrapper>
            <EventCreateForm />
        </Wrapper>
    );
}
6 - Add authentication to your application
Amplify Auth is powered by AWS Cognito. To integrate in your front-end application, you need the Authenticator component, which is automatically configured based on the outputs generated from your backend. Here is an example:
					function App() {
  async function handleSignOut() {
    await signOut();
  }

  return (
    <Authenticator>
      <main>
        <Header></Header>
        <EventLanding></EventLanding>
        <Footer signOut={handleSignOut}></Footer>
      </main>
    </Authenticator>
  );
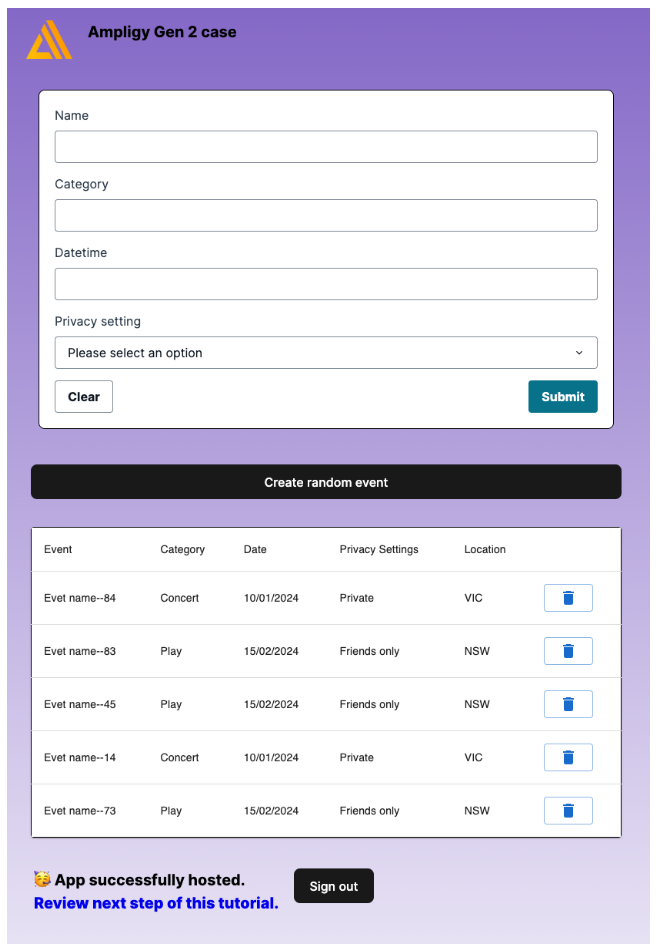
Result
As you can see, with just a few tweaks, we were able to generate a model, form, APIs and tables easily with Amplify libraries. You can this see in the picture below. I also took the liberty to add a Material UI data-table to display our results.
You can check the code repository here: https://github.com/alanst32/alan-amplify-gen2/tree/dev
Conclusion
Amplify Gen 2 is definitely an improvement on its predecessor, offering an easy and quick solution to build full stack applications, now with the numerous benefits of Typescript. To learn more about Amplify Gen 2, check its official page: AmplifyGen2.
Modernise with Cevo
Cevo can help you reach the full potential of the cloud. Our modernisation approach allows you to seamlessly and securely navigate your cloud migration. Our collaborative strategy leverages modern approaches and tools to unlock the potential of advanced technologies such as artificial intelligence and state-of-the-art security controls.
Want to know more about our modernisation offer? Check our website or reach out to us: https://cevo.com.au/modernisation/