We take many of the AWS concepts for granted every day. Well at least I do. But sometimes something new comes along and while the documentation usually is pretty good at explaining it. I do not fully appreciate the nuances until I have tried it myself and really dug into how it works both conceptually and practically. Trusted Identity Propagation (TIP) is one such concept that I had a hard time grasping so I will share my findings to help spread the work that it actually makes a lot of sense, and you will be hearing more about it I can guarantee that.
What is Trusted Identity Propagation?
This is a way of allowing an AWS (or some custom developed application) to request access to data or other AWS resource based on a users identity – eg their corporate identity such as Entra/Okta/etc. Historically you have had to setup IAM Users with static API keys, various methods to assume roles to get temporary API keys, etc. TIP is a managed process that allows the authorised users identity (stored in a JWT token) to be swapped for AWS temporary credentials to access a resource as that user. For this to occur the organisation must be using IAM Identity Center (IIC) – as IIC is what facilitates this process of token swapping, checking scopes and finally providing a context assertion that is passed to AWS Security Token Service (STS) to consume as part of the AssumeRole API call. The neat thing is – that the user identity is preserved when the role is assumed so the end service knows exactly which Identity Center UserID is consuming the service to allow fine grain access to data.
For AWS services – TIP is configured from within the specific AWS Service console or CLI. This handles configuring the integration with Identity Center for the service. When configured this appears within the Identity Center console for visibility and management.
TIP came to my attention initially during the release of S3 Access Grants back at re:Invent 2023. This allows you to grant access to S3 Objects using the TIP process described above for fine grain access to S3 objects. Other services are integrated with TIP too, such as this list from the AWS Console:
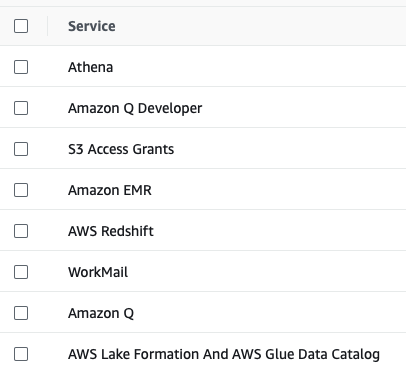
You can also see in this managed policy AWSIAMIdentityCenterAllowListForIdentityContext a summary of the services that can be integrated. In fact, when the AssumeRole is called with an associated Identity Context – this policy is applied during the AssumeRole call by STS and these are the only allowed actions allowed during that period. The link here provides a handy history of the changes to this policy (and all other IIC policies as well).
One other concept that needs explaining – in IAM Identity Center is a concept known as a Trusted Token Issuer. An application that authenticates outside of AWS and needs to access AWS applications on behalf of their users can map the user to an IAM Identity Center user and get temporary credentials to access these applications if they are setup as a Trusted Token Issuer. In the past this sort of federation could be used via Cognito Identity Pools as an example to be able to assume an AWS role. Now there is a new way by using Identity Center for the AWS applications that support TIP.
So lets get down to business.
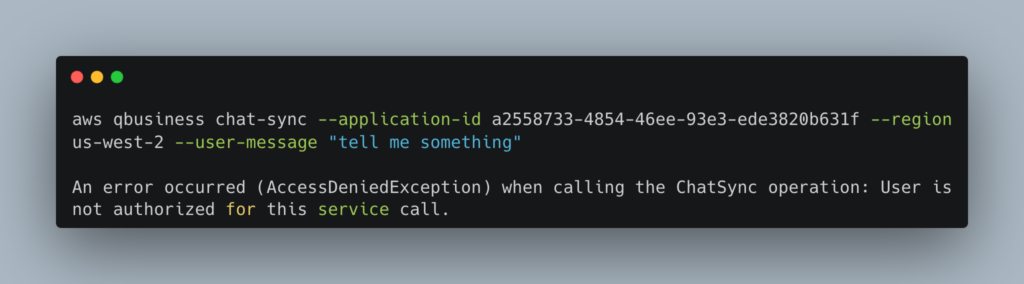
I have been playing with Amazon Q for Business as I mentioned here. I wanted to understand more on how the TIP process actually worked by getting usable STS tokens to run the ChatSync API. As this service relies on a subscription – the API will only successfully execute if it knows who the end user from Identity Center is to check subscription details.
Even if I call it with an Administration role I get this error:
As mentioned above, the AssumeRole session needs to have the Identity context of the Identity Center user id. In CloudTrail, this would look something like the onBehalfOf in this fragment:
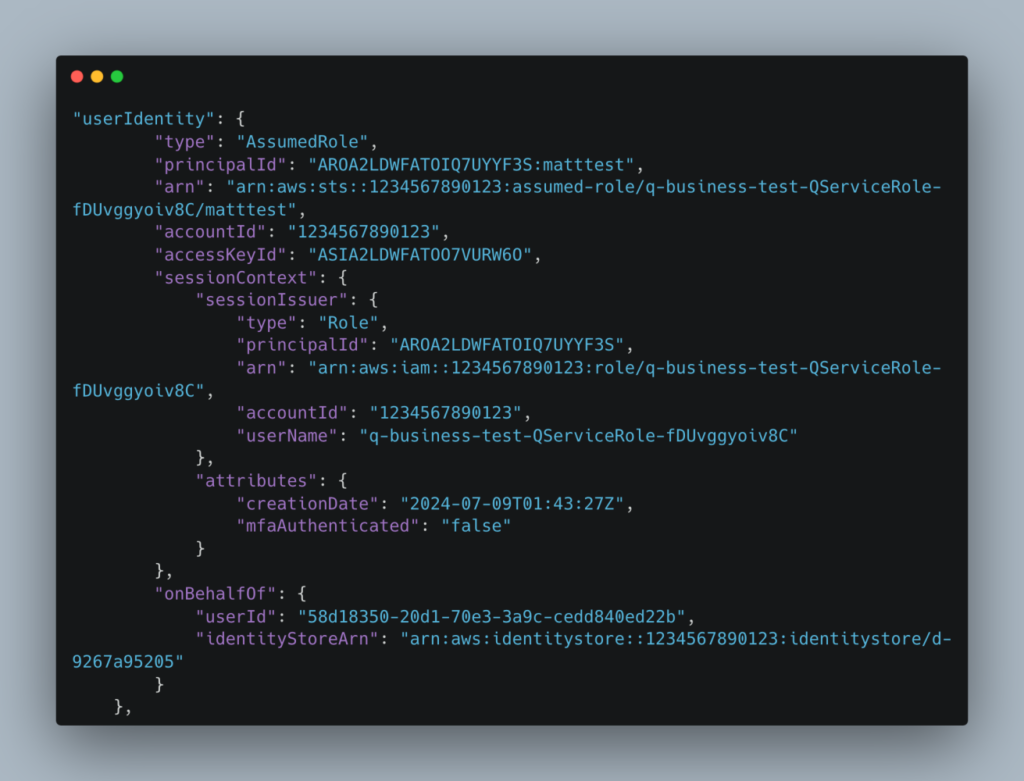
onBehalfOf.userId contains the userId GUID as defined in IAM Identity Center. Without that key – no identity has been propagated. So how do we do this?
Well AWS actually have the process documented quite nicely here. However its more fun to try it for real – so lets go!
Follow these steps if you are following along:
1) I deployed this sample app. The app itself needed a couple of minor changes to work for me but actually we don’t care about getting the app to work. We care about the Cognito user pool that was deployed.
2) I also needed to run through the 2-6 steps here to get us the Trusted Token Issuer configured. Cognito will be our IdP that we will use to map to an Identity Center user via the above trusted token issuer config and be able to get a valid identity context which will give us the onBehalfOf decoration mentioned above to the userIdentity during the AssumeRole.
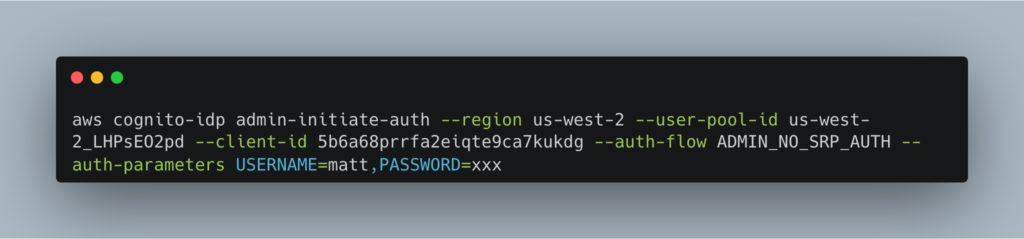
3) In the Cognito config – temporary enable ADMIN_NO_SRP_AUTH in the user pool app so we can easily get an IdToken.
4) We need to get the users IdToken – so run this Cognito cli:
And you get this:
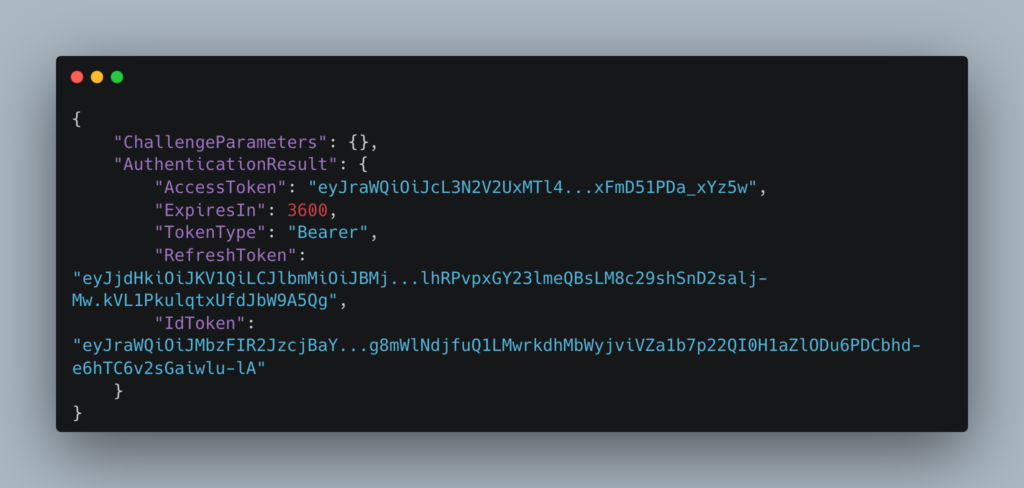
The IdToken looks like this:
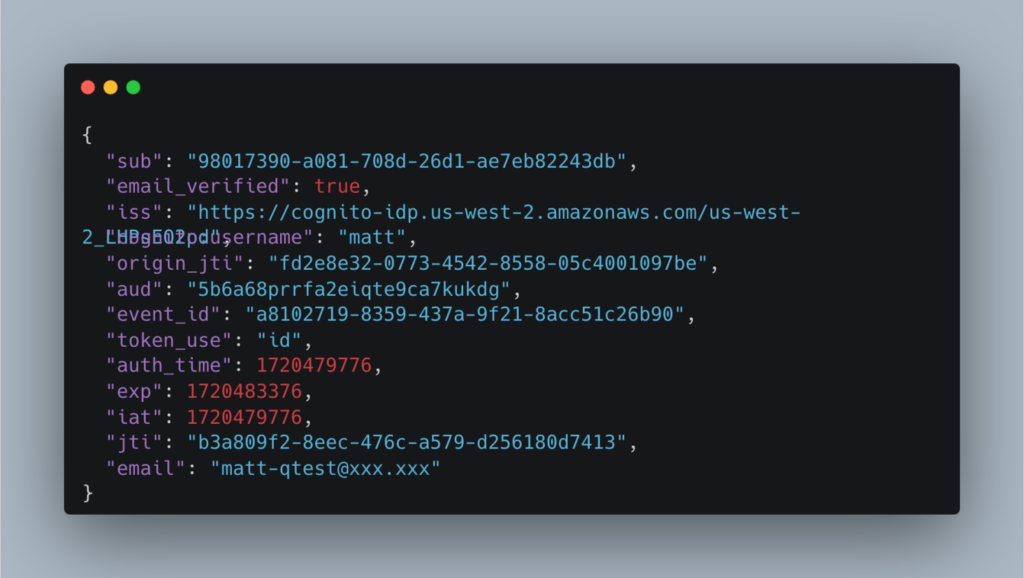
And for our example – the email is the attribute that will be mapped to the IAM Identity Center user in the next step.
5) We now need to exchange the Cognito IdToken JWT for an IdToken from IAM Identity Center with the CreateTokenWithIAM API call. We tell Identity Center we have a JWT bearer token and the IdToken is the assertion. Here Identity Center will map the token to the correct user via the email JWT attribute:
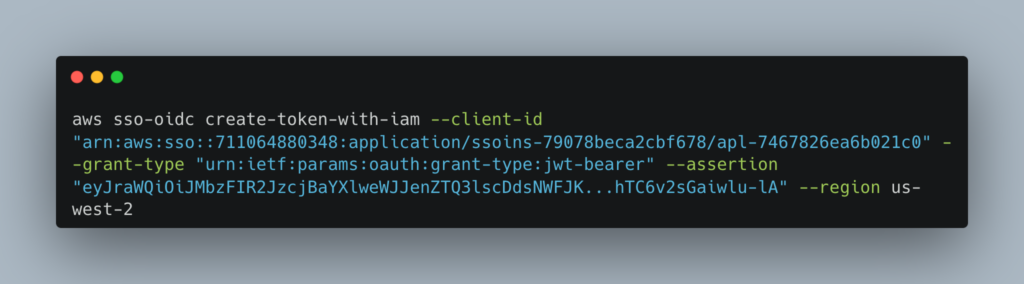
And voila! We have a Identity Center tokens!
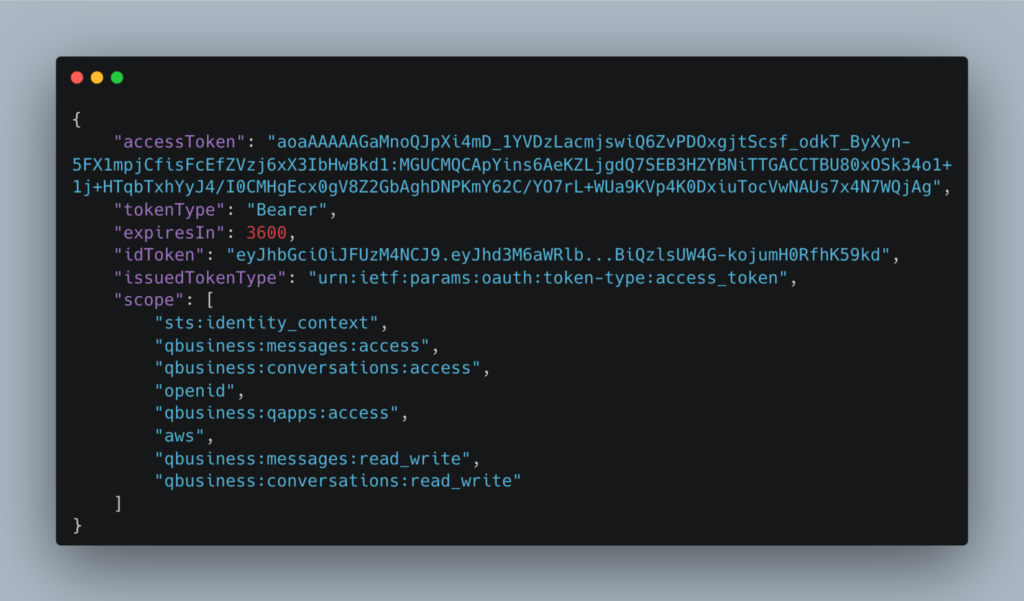
Fun fact – that API call needs to be authorised by IAM – so your active role needs to have this permission – sso-oauth:CreateTokenWithIAM. The other Identity Center OIDC API calls are not authenticated. The response has which scopes are allowed for the user. And the idToken (note the lower case i – sigh) looks something like this:
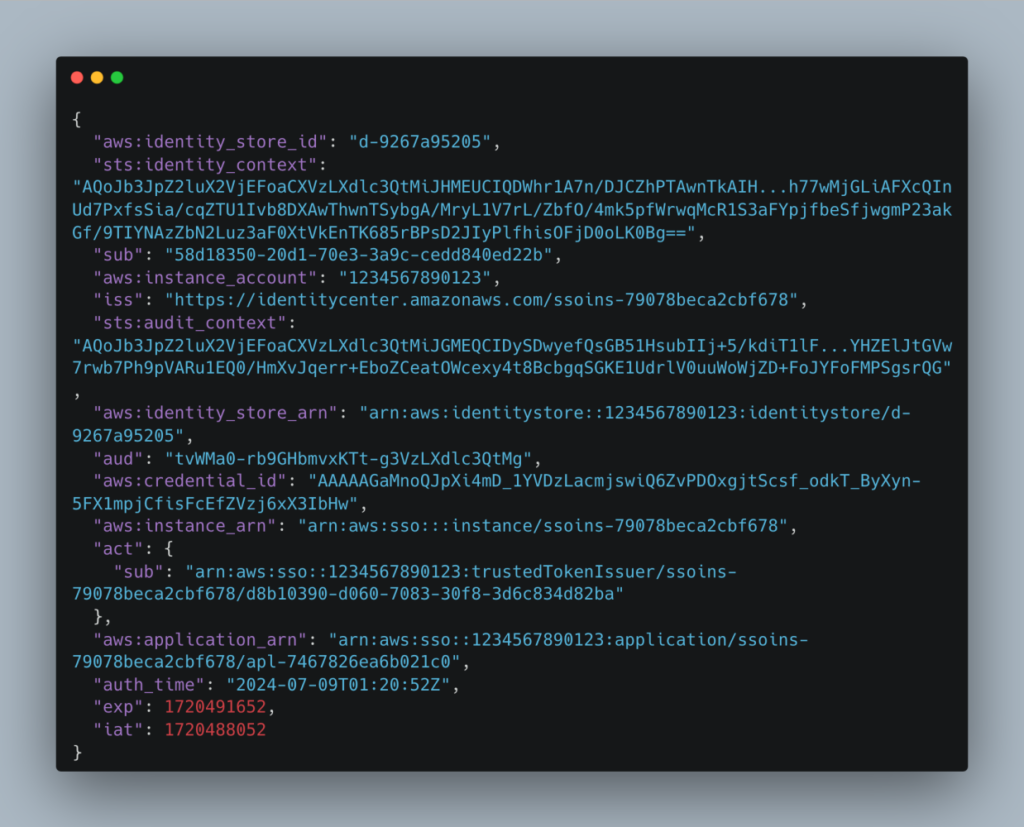
The important part of this token is the sts:identity_context key. A description of identity_context and audit_context is on this page.
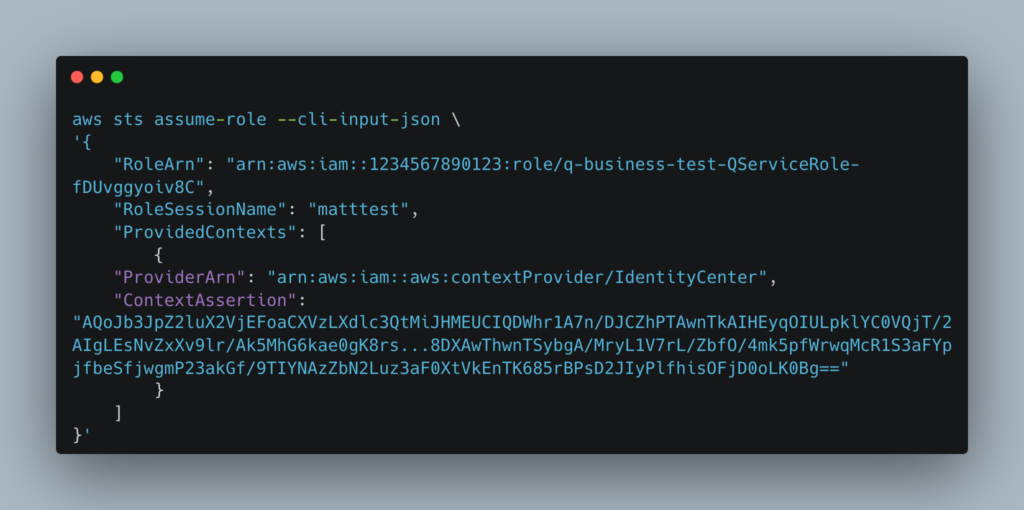
6) We can now AssumeRole on behalf of the Identity Center user!
And the response is some AWS creds:
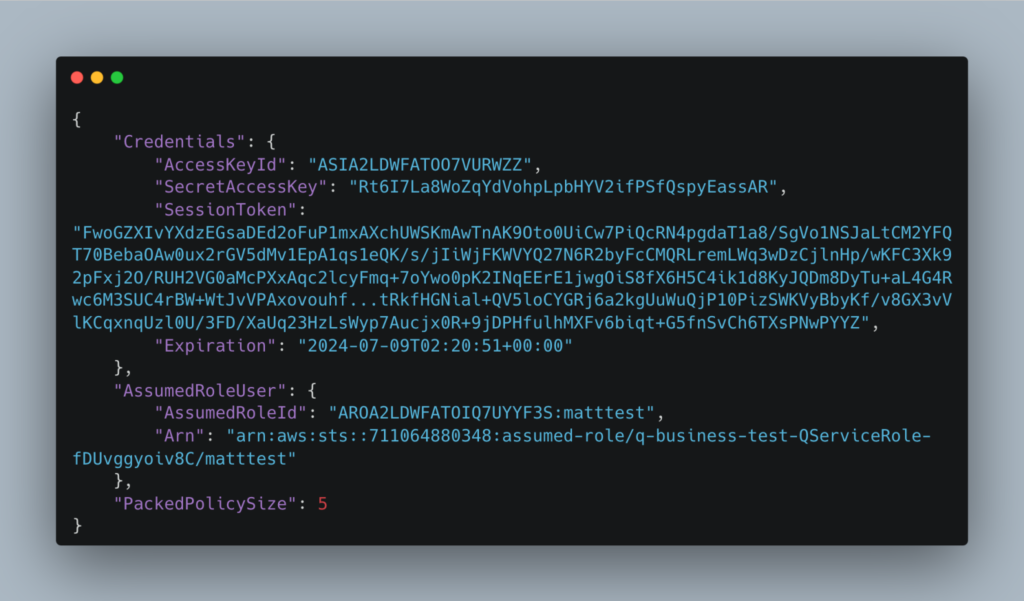
Note that we can see STS added a session policy – the clue is the PackedPolicySize key.
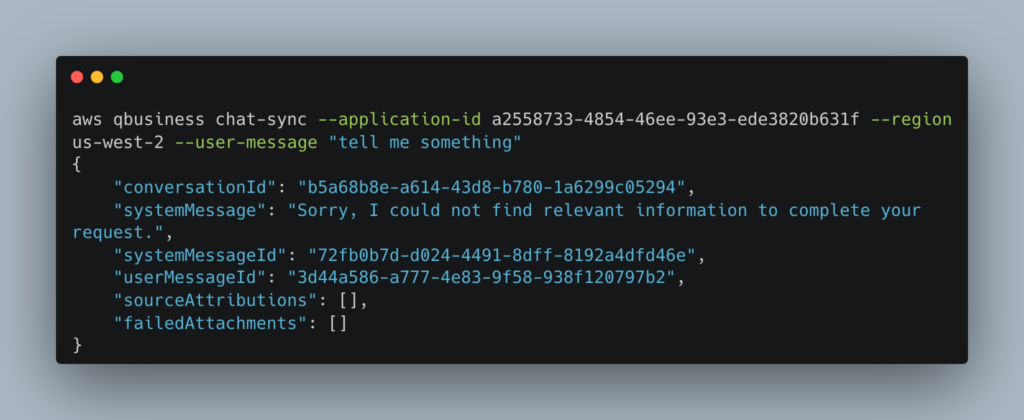
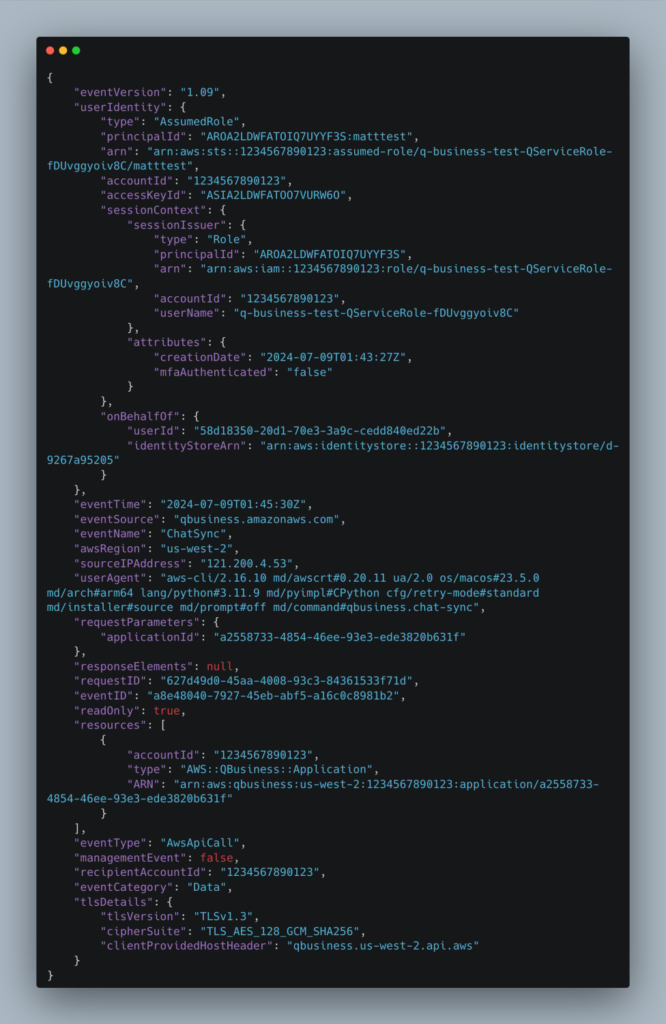
We can then use these and successfully run ChatSync:
Remember that data plane CloudTrail events are not enabled by default. If you enable AWS::QBusiness::Application CloudTrail data logging as per here you can see the successful CloudTrail Data event corresponding to the ChatSync API:
I hope this practical example gave you some insight into how the new Trusted Identity Propagation feature works. While I described it for a custom Q for Business application, its similar concepts for other integrated applications too. Behind the scenes someone (either you or an AWS service) is calling AssumeRole and with some user identity context to be able to access another service to do the thing!